Monday, 8 September 2014

Servo control

Introduction

A robot to be able to participate in the interaction with the environment should use the servos. We can control the servo using PWM outputs.

We need:

  • Arduino with firmata library (Firmata - Arduino)
  • Raspberry Pi with python and firmata package (Firmata - Raspberry Pi)
  • servo, can be very cheap (eg. TG9)
  • additional DC supply or battery, voltage should be adjusted to the servo

Servo connection

In scheme we need additional supply DC. It's very important! Servo gets high current, which can not provide the power arduino (in our case the usb Raspebrry).
DC supply voltage must be matched to the voltage servo. Most servos working with voltages 4.8 - 6.0V.

Schema


Breadboard

and photo from my real connections:


I replaced the batteries DC power supply.

Software

Access to the servo with python:
from pyfirmata import ArduinoMega
board = ArduinoMega('/dev/ttyUSB0')#usb port
servo = board.get_pin('d:2:s')     #pin PWM no 2 (depending
servo.write(50)                    #set servo position 0-255


Below I put the program to command line control the servo. Should focus on two lines, one:
board = ArduinoMega('/dev/ttyUSB0') # usb port
If necessary, change the port that is connected to the Arduino.
second:
servo = board.get_pin('d:2:s') # pin PWN no 2
where:
d - digital output (not change)
2 - number PWM pin to connect the servo
s - servo control. This is very important! If you set the "p" (power) can damage the servo!

Sample app to command line control the servo:

from pyfirmata import ArduinoMega, time
board = ArduinoMega('/dev/ttyUSB0') # usb port
servo = board.get_pin('d:2:s') # pin PWM no 2

__copyright__ = "Copyright 2014, http://letsmakearobot.blogspot.com/"
__version__ = "0.1.0"
__license__ = "GPL"
__email__ = "sebastian.dziak@gmail.com"

def info():
    print "------------------------------------------------"
    print "Command parameters:"
    print "  0-255 - sevo position"
    print "  ...and exit from app: exit"
    print
    print "Examples:"
    print "  25"
    print "  120"
    print "  exit"
    print "------------------------------------------------"

def validate(position):
   if not position is None and (float(position)<0 or float(position)>255):
      return "Invalid parameter!"

info()
while True:
   value = raw_input('Position (0-255):')
   if value == 'exit': break  
   resp = validate(value)
   if resp is None:
      servo.write(float(value))
   else:
      print resp
 
print "goodbye"

links:
http://arduino.cc/en/Tutorial/sweep
http://www.robotoid.com/appnotes/arduino-operating-two-servos.html

Saturday, 24 May 2014

DC motor controller

Introduciton

A robot must have a possibility to move. One of the simplest solutions is to use a tracked chassis propelled by two engines. Two DC motors working allows for forward movement, one motor or two in differnet directions - turn left/right.

We need

  • L298N coontroller
  • Arduino with firmata library
  • Raspberry Pi with python and firmata package
  • two DC motors for test (probably we will use other engines to drive the robot)


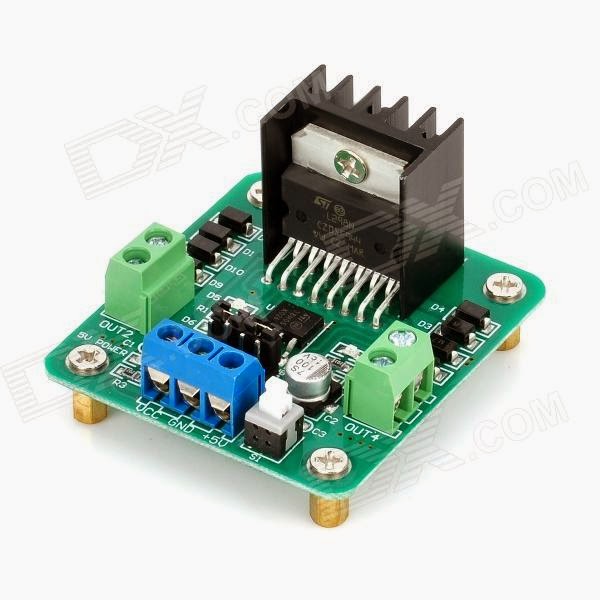
Motor drive controller with L298N module

L298N DC motors controller specification:
  • operating voltage <48V
  • 2A per channel
  • the maximum 20W power at 75 °C
  • supply current 36mA circuit  
  • operating temperature:-20C +135 C
  • dimensions 44mm x 44mm x 27mm
I took the diagram from  http://www.funnyrobotics.com/2011/03/arduino-with-l298n-based-dual-motor.html

and my test connections:


my application to control motors (motor_test.py):
from pyfirmata import ArduinoMega
board = ArduinoMega('/dev/ttyUSB0')

__copyright__ = "Copyright 2014, http://letsmakearobot.blogspot.com/"
__version__ = "0.2.0"
__license__ = "GPL"
__email___ = "sebastian.dziak@gmail.com"

pin_motor_A_L = board.get_pin('d:4:p')
pin_motor_A_R = board.get_pin('d:5:p')
pin_motor_B_R = board.get_pin('d:6:p')
pin_motor_B_L = board.get_pin('d:7:p')

cmd_motor = ('A','B')
cmd_direction = ('L','R','S')
invalid_number_parameters = "Invalid number of parameters!"
invalid_parameter = "Invalid parameter: "

def set_motor(motor, cmd, speed):
    if args[0]=='A':
        if cmd=='S':
        pin_motor_A_L.write(0)  
        pin_motor_A_R.write(0)  
        elif cmd=='L':
        pin_motor_A_R.write(0)             
        pin_motor_A_L.write(speed)  
        elif cmd=='R':
        pin_motor_A_L.write(0)  
        pin_motor_A_R.write(speed)  

    if args[0]=='B':
        if cmd=='S':
        pin_motor_B_L.write(0)  
        pin_motor_B_R.write(0)  
        elif cmd=='L':
        pin_motor_B_R.write(0)             
        pin_motor_B_L.write(speed)  
        elif cmd=='R':
        pin_motor_B_L.write(0)  
        pin_motor_B_R.write(speed)  

   
def info():
    print "------------------------------------------------"
    print "Command parameters:"
    print "  A,B - motor id"
    print "  L,R,S - L - left rotation, R - right rotation, S - motor stop"
    print "  0.0-1.0 - velocity (should be given only with the option of L or R)"
    print "  ...and exit from app: exit"
    print   
    print "Examples:"
    print "  A R 0.4"
    print "  A S"
    print "------------------------------------------------"

def validate(engine, cmd, speed):
    if engine not in cmd_motor:
        return invalid_parameter+engine
    elif cmd not in cmd_direction:
        return invalid_parameter+cmd
    elif cmd=='S' and not speed is None:
        return invalid_number_parameters
    elif (cmd=='L' or cmd=='R') and speed is None:
        return invalid_number_parameters
    elif not speed is None and (float(speed)<0.0 or float(speed)>1.0):
         return invalid_parameter+speed

info()
while True:
    cmdLine = raw_input('CMD (A/B L/R/S 0.0-1.0):')
    if cmdLine == 'exit': break    

    args = cmdLine.split() 

    if len(args)>0:    
        engine = args[0]
    else:
        engine = None

    if len(args)>1:    
        cmd = args[1]
    else:
        cmd = None
    
    if len(args)>2:    
    speed = float(args[2])
    else:
    speed = None       

    resp = validate(engine, cmd, speed)

    if resp is None:
    set_motor(engine, cmd, speed)
    else:
    print resp

print "goodbye"


links:
http://arduino-info.wikispaces.com/MotorDrivers
http://www.st.com/st-web-ui/static/active/en/resource/technical/document/datasheet/CD00000240.pdf
http://www.funnyrobotics.com/2011/03/arduino-with-l298n-based-dual-motor.html 
http://en.wikipedia.org/wiki/Phase-locked_loop


Tuesday, 13 May 2014

Speech synthesizer

We need

  • Raspberry Pi with ArchLinux
  • Sound output devices connected to mini-jack. I use amplituner with spekares. For tests we can use computer speakers or headphone.
 

Base sound software

Install:
# pacman -Sy alsa-utils alsa-plugins
call sound test:
# speaker-test -c 2

We should hear the test sound.


Festival synthesizer

Install Festival synthesizer:
# pacman -Sy festival festival-english
call Festival test from command line:
# echo "Hello Dave" | festival --tts
We should hear sound "Hello Dave".

Next step, we call Festival from Python code (is useful in the future). If it does not exist, create a directory
# mkdir robot   
create Python enviroment:
# cd robot/
# virtualenv2 --no-site-packages python_festival_test
# cd python_festival_test/
# source bin/activate
create file festivalTest.py:
import subprocess
text = '"Hello Dave"'
subprocess.call('echo '+text+'|festival --tts', shell=True)
call script:
# python2.7 festivalTest.py
We should hear sound "Hello Dave".

Additional

Install command line mp3 player:
# pacman -Sy mpg123

and play mp3 file:
# mpg123 example_file.mp3
Sound volume, check status:
# amixer
example response:
Simple mixer control 'PCM',0
  Capabilities: pvolume pvolume-joined pswitch pswitch-joined
  Playback channels: Mono
  Limits: Playback -10239 - 400
  Mono: Playback 40 [97%] [0.40dB] [on]
change volume:
# amixer cset numid=1 -- $sound_volume
where:
$sound_volume - is number beetwen -10239 and 400
numid - output: 0=auto, 1=analog, 2=hdmi


links:
https://wiki.archlinux.org/index.php/Advanced_Linux_Sound_Architecture
http://www.correderajorge.es/can-your-raspberry-pi-talk-2/
http://machakux.appspot.com/blog/44003/making_speech_with_python
http://www.raspberrypi-spy.co.uk/2013/06/raspberry-pi-command-line-audio/
http://www.imdb.com/character/ch0002900/quotes


Thursday, 8 May 2014

RaPi Camera video streaming


We need

Raspberry Pi with ArchLinux and configured RaPi Camera.


Compile and run mjpg-streamer

install packages:
# pacman -Sy git gcc make cmake libjpeg-turbo

download and compile mjpg-streamer:
# cd /opt
# mkdir mjpg-streamer
# git clone https://github.com/jacksonliam/mjpg-streamer.git ./mjpg-streamer
# cd mjpg-streamer/mjpg-streamer-experimental
# make clean all
create run.sh file:
#!/bin/bash
LD_LIBRARY_PATH=/opt/mjpg-streamer/mjpg-streamer-experimental/ /opt/mjpg-streamer/mjpg-streamer-experimental/mjpg_streamer -i "input_
raspicam.so -fps 15 -q 50 -x 640 -y 480" -o "output_http.so -p 9000 -w /opt/mjpg-streamer/mjpg-streamer-experimental/www" &
add execution privileges:
# chmod +x run.sh

streaming test:
# ./run.sh
Camera LED should light up. Open in http browser url http://you_raspberry_address:9000/stream.html

We should see something like:


Autorun streaming  script

Create file /etc/systemd/system/mjpg-streamer.service:
[Unit]
Description=mjpg-streamer for robot
[Install]
WantedBy=multi-user.target

[Service]
Type=oneshot
RemainAfterExit=yes
ExecStart=/opt/mjpg-streamer/mjpg-streamer-experimental/run.sh
WorkingDirectory=
/opt/mjpg-streamer/mjpg-streamer-experimental
and call commands:
#systemctl start mjpg-streamer
#systemctl enable mjpg-streamer


Final test

Reboot Raspberry and call in browser http://you_raspberry_address:9000/stream.html


links:
http://www.miguelmota.com/blog/raspberry-pi-camera-board-video-streaming/
http://blog.miguelgrinberg.com/post/stream-video-from-the-raspberry-pi-camera-to-web-browsers-even-on-ios-and-android/page/2
http://blog.miguelgrinberg.com/post/how-to-build-and-run-mjpg-streamer-on-the-raspberry-pi
https://wiki.archlinux.org/index.php/Systemd
http://grammarofdev.blogspot.com/2013/11/autorun-startup-script-on-raspberry-pi.html


Saturday, 3 May 2014

Install RaPi Camera

Introduction

A good idea for remote control robot is a preview video. Raspberry Pi can connect to a dedicated high-quality camera.

We need

  • Raspberry Pi with ArchLinux
  • Raspberry Pi Camera (operating in the visible light) or Raspberry Pi NOIR (operating in the infrared)

  Raspberry Pi Camera, first (green shield) for the visible light, second (black) for the infrared.


Camera connection

Camera package includes ribbon cable. The free cable end should be connected to the Raspberry.


The cable you need to insert the appropriate side, blue side is to be directed toward the ethernet port.


Position ribbon cable before installation.

Camera installed.


Standard RaPi Camera software

Run Raspberry and add two line to file /boot/config.txt:

start_file=start_x.elf
fixup_file=fixup_x.dat

restart Raspberry.

If you  want turn off led dide on board camera add line to /boot/config.txt:
disbale_camera_led=1

When you login, you can take a picture or record a video.
Take a picture:
# /opt/vc/bin/raspistill -o testimage.jpg
Record 10 seconds video:
 # /opt/vc/bin/raspivid -t 10000 -fps 25 -o testvideo.h264 


links:

Wednesday, 30 April 2014

Firmata - Raspberry Pi (part 2a, access from python)

Introdution


We have prepared earlier Arduino with an installed library Firmata (post how to prepare Arudino with firmata - link). Now we connect from the Raspberry to the Arduino with Firmata. We have the possibility to connect from most programming languages.


We need

  • Raspberry Pi with installed ArchLinux
  • Arduino(Mega) with installed Firmata library (Firmata - Arduino)
The ArduinoMega connected to the Raspberry Pi


Installation Python 2.7


refresh of all package list:
# pacman -Syy
install python:
# pacman -Sy python2 python2-pip python2-virtualenv
test installation:
# python2 --version
we should see something like:
Python 2.7.6
if all is ok, create python enviroment:
# mkdir robot   
# cd robot/
# virtualenv2 --no-site-packages python_firmata_test
# cd python_firmata_test/
# source bin/activate

install pySerial:
# pip2 install pyserial

install pyFirmata:
# pip2 install pyfirmata


Now we can write simple application that controls LED13 on Arduino, full code of this app is below (file binkingLed13.py):
from pyfirmata import ArduinoMega, time
board = ArduinoMega('/dev/ttyUSB0')

while True:
   board.digital[13].write(1)
   time.sleep(1)
   board.digital[13].write(0)
   time.sleep(1)

We can run this command:
# python binkingLed13.py
After a few seconds, the LED should start blinking at a frequency of 1 Hz. To exit, press ctrl + c
  
Localization LED13

If you have problems with usb port you can list usb ports:
# ls /dev/ttyUSB*


links:
https://www.python.org/
https://pypi.python.org/pypi/pyserial/2.7 
https://pypi.python.org/pypi/pyFirmata/0.9.5

Friday, 25 April 2014

Firmata - Arduino (part 1)

Introduction


First step is installation Firmata library on Arduino shield. Installed library allows to use Arduino as the A/D and D/A. The control logic will be on Raspberry and communicate will be over USB (Firmata protocol) with Arduino.


We need

  • Arduino board (in my example is it ArduinoMega)
  • Arduino IDE Software
  • PC with USB port ;)


ArduinoMega board


Arduino IDE Software


Download and install Arduino IDE from page http://arduino.cc/en/Main/Software

Connect Arduino to PC and run Arduino IDE:
# sudo ./arduino
If you use linux, you need to use root (sudo) access to have access to the USB port.

select valid Arduino port:


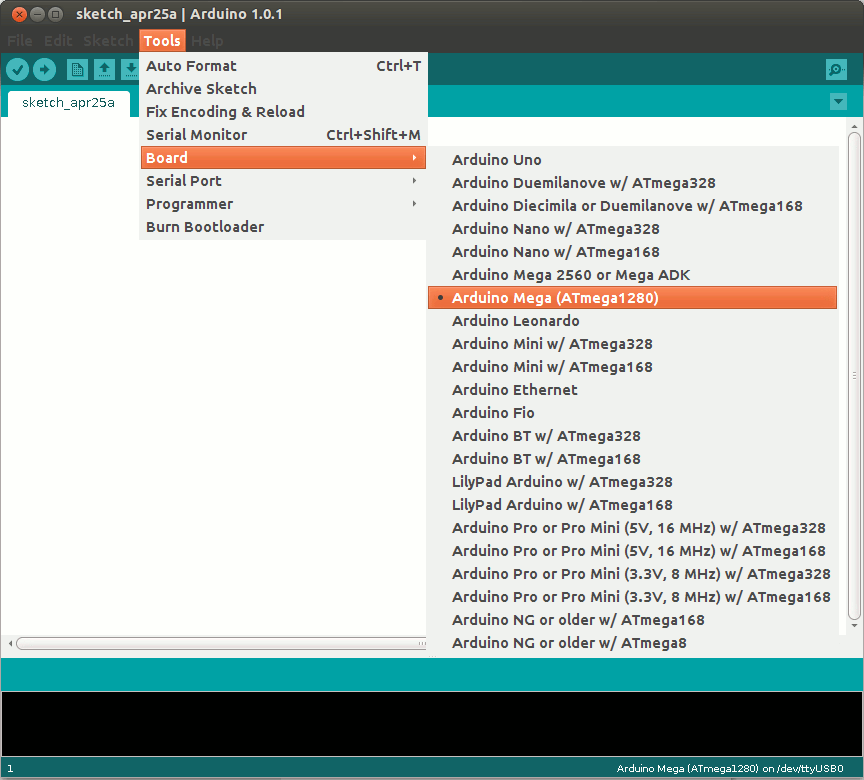
select valid Arduino board:


select Standard Firmata library:


compile and send library to Arduino board:


It's all. Arduino is ready.

We can't test without a second module - Raspberry. How to connect with Rasspbery I will explain in the next post.


links:
http://arduino.cc/en/Main/Software
http://firmata.org/wiki/Main_Page