Wednesday 30 April 2014

Firmata - Raspberry Pi (part 2a, access from python)

Introdution


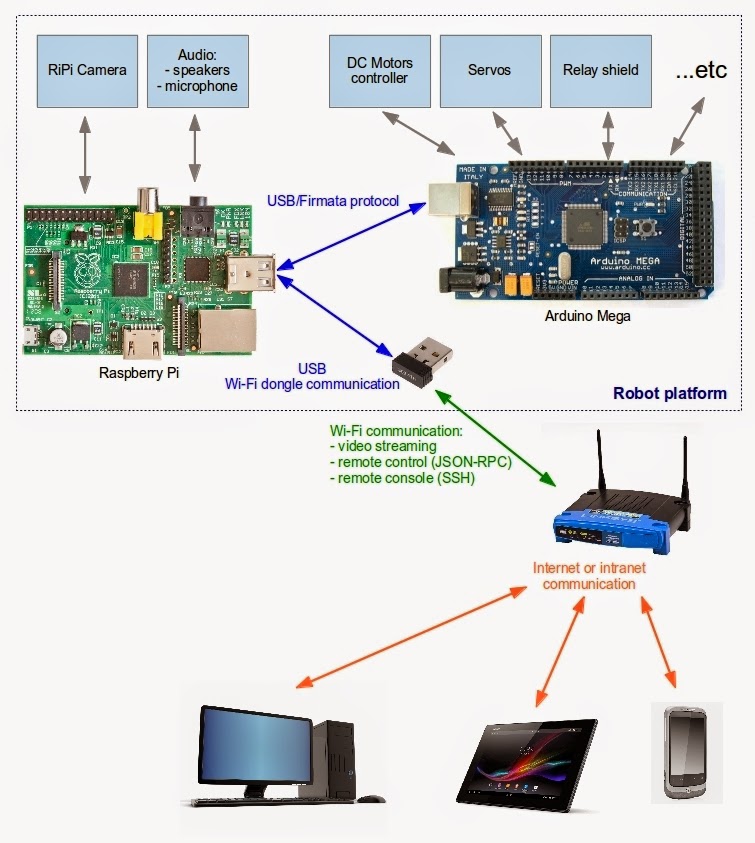
We have prepared earlier Arduino with an installed library Firmata (post how to prepare Arudino with firmata - link). Now we connect from the Raspberry to the Arduino with Firmata. We have the possibility to connect from most programming languages.


We need

  • Raspberry Pi with installed ArchLinux
  • Arduino(Mega) with installed Firmata library (Firmata - Arduino)
The ArduinoMega connected to the Raspberry Pi


Installation Python 2.7


refresh of all package list:
# pacman -Syy
install python:
# pacman -Sy python2 python2-pip python2-virtualenv
test installation:
# python2 --version
we should see something like:
Python 2.7.6
if all is ok, create python enviroment:
# mkdir robot   
# cd robot/
# virtualenv2 --no-site-packages python_firmata_test
# cd python_firmata_test/
# source bin/activate

install pySerial:
# pip2 install pyserial

install pyFirmata:
# pip2 install pyfirmata


Now we can write simple application that controls LED13 on Arduino, full code of this app is below (file binkingLed13.py):
from pyfirmata import ArduinoMega, time
board = ArduinoMega('/dev/ttyUSB0')

while True:
   board.digital[13].write(1)
   time.sleep(1)
   board.digital[13].write(0)
   time.sleep(1)

We can run this command:
# python binkingLed13.py
After a few seconds, the LED should start blinking at a frequency of 1 Hz. To exit, press ctrl + c
  
Localization LED13

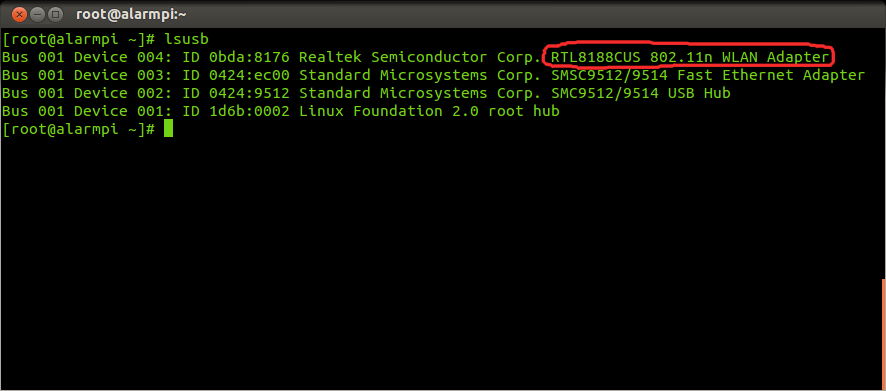
If you have problems with usb port you can list usb ports:
# ls /dev/ttyUSB*


links:
https://www.python.org/
https://pypi.python.org/pypi/pyserial/2.7 
https://pypi.python.org/pypi/pyFirmata/0.9.5

Friday 25 April 2014

Firmata - Arduino (part 1)

Introduction


First step is installation Firmata library on Arduino shield. Installed library allows to use Arduino as the A/D and D/A. The control logic will be on Raspberry and communicate will be over USB (Firmata protocol) with Arduino.


We need

  • Arduino board (in my example is it ArduinoMega)
  • Arduino IDE Software
  • PC with USB port ;)


ArduinoMega board


Arduino IDE Software


Download and install Arduino IDE from page http://arduino.cc/en/Main/Software

Connect Arduino to PC and run Arduino IDE:
# sudo ./arduino
If you use linux, you need to use root (sudo) access to have access to the USB port.

select valid Arduino port:


select valid Arduino board:


select Standard Firmata library:


compile and send library to Arduino board:


It's all. Arduino is ready.

We can't test without a second module - Raspberry. How to connect with Rasspbery I will explain in the next post.


links:
http://arduino.cc/en/Main/Software
http://firmata.org/wiki/Main_Page

Wifi static IP configuration

Introdution


If we want to have a cool wireless robot with which we can remote communicate we need a wireless communication. The best and also the easiest solution seems to be a standard network connection over wifi.

We need

  • Raspberry Pi with ArchLinux
  • wifi dongle
  • enabled and configured wifi router


Wifi dongle


Wifi dongle detection


Plug the wireless dongle into the USB port of Raspberry. Check if the device has been detected, call:
# lsusb
We should see some WLAN adapter, for example:


depending on the wifi dongle written information can be a bit different. On these screens is very cheap and popular device.

Configure static IP


copy example config file:
# cp /etc/netctl/examples//wireless-wpa-static /etc/netctl/robot-wireless-profile
edit new file (you can run more intuitive editor than the vi ;))
# vi /etc/netctl/robot-wireless-profile
 contents of the file:
Description='Lets make a robot example'
Interface=wlan0
Connection=wireless
Security=wpa
ESSID='ssid_of_your_network' #edit this line
Key='your_wpa_shared_key' #edit this line
IP=static
Address='your_static_ip/24' #edit this line
Gateway='192.168.1.1'
DNS=('dns_server1' 'dns_server2')
# Uncomment this if your ssid is hidden
#Hidden=yes
in most default configured networks just modify four lines (yellow text).

Parameter:
Security=wpa
is valid for both WPA and WPA2.

run wifi connection:
# netctl start robot-wireless-profile
if there are no errors check the connection:
# ifconfig
we should see:

To wifi connection was established at system startup you need to call:
# netctl enable robot-wireless-profile

The final test

  • stop ArchLinux:
    # shutdown
  • unplug the ethernet cable
  • reconnect the power
  • try to connect to your wifi ip, eg (change the IP 192.168.1.112 to your):
    # ssh root@192.168.1.112

links:

Wednesday 16 April 2014

Install ArchLinux

We need

  • Raspberry Pi
  • SD Card, minium 4GB
  • Power supply
  • LAN connection and Wi-Fi router
  • PC with SD card connector (I describe operation on Ubuntu, it's possible use Windows)


Install image ArchLinux


Download image ArchLinux from http://www.raspberrypi.org/downloads/


unpack:
$ unzip ./ArchLinuxARM-2014.01-rpi.img.zip

call command:
$ lsblk

example response:
NAME   MAJ:MIN RM   SIZE RO TYPE MOUNTPOINT
sr0     11:0    1  1024M  0 rom 
sde      8:64   0 929.5G  0 disk
├─sde1   8:65   0   100M  0 part
├─sde2   8:66   0  97.6G  0 part
├─sde3   8:67   0     1K  0 part
├─sde4   8:68   0  1023K  0 part
├─sde5   8:69   0   293G  0 part /
├─sde6   8:70   0     8G  0 part [SWAP]
└─sde7   8:71   0 530.9G  0 part

insert SD card, wait few seconds and call again:
$ lsblk

example response:
NAME   MAJ:MIN RM   SIZE RO TYPE MOUNTPOINT
sr0     11:0    1  1024M  0 rom 
sda      8:0    1  14.9G  0 disk
└─sda1   8:1    1  14.9G  0 part /media/0C11-B443
sde      8:64   0 929.5G  0 disk
├─sde1   8:65   0   100M  0 part
├─sde2   8:66   0  97.6G  0 part
├─sde3   8:67   0     1K  0 part
├─sde4   8:68   0  1023K  0 part
├─sde5   8:69   0   293G  0 part /
├─sde6   8:70   0     8G  0 part [SWAP]
└─sde7   8:71   0 530.9G  0 part

On the second call, we see an additional drive sda. On my computer it is sda, on the other may be another drive. You need to be sure 100% that actually you call the name of the inserted SD card.

copy linux image to sd card (WARNING: change sda to name in your system. If you enter the wrong parameter, you can delete your data on HDD!):
$ sudo dd if=./ArchLinuxARM-2014.01-rpi.img of=/dev/sda bs=4096
next call:
$ sudo sync

Default ArchLinux image create 2GB partition. You can use the GParted to expand the partition to the entire SD card.

Screen before changes.


Screen after changes.


Insert SD card to Raspberry Pi, insert Wi-Fi dongle, connect LAN cable and supply power. In my description you don't need connect keyboard and monitor to Raspberry.

We have to wait a few minutes and we scan network from your PC (we need to determine Raspberry IP address):
$ sudo nmap -sP 192.168.1.*


You can compare results before and after connection Raspberry. New IP address is probably Raspberry Pi address. In my example is it 192.168.1.102. We can login via ssh:
$ ssh root@192.168.1.102

Default password is root

Change password, call:
# passwd
Upgrade ArchLinux:
# pacman -Syu

Real time clock


RaPi doesn't have a real-time clock. In many cases, time is needed (for example, an HTTPS connection and verification certificates). We can install Network Time Protocol daemon:
# pacman -S ntp
 We can check the current date and time, call:
# date
If the time is in the wrong time zone, we can change it. Below are a few useful commands.

To check the current zone:
# timedatectl status
To list available zones:
# timedatectl list-timezones
To change the time zone to the Warsaw zone:
# timedatectl set-timezone Europe/Warsaw


links:
http://www.raspberrypi.org/downloads/
http://superuser.com/questions/352598/how-to-find-the-dev-name-of-my-usb-device
http://raspberrypi.stackexchange.com/questions/266/how-can-i-keep-system-time
https://wiki.archlinux.org/index.php/time
 

A robot idea


I have an idea to build a robot who connect two popular devices:
- Raspberry Pi
- ArduinoMega
Raspberry Pi is great platform for building advanced  system on a linux platform. We can easy add wifi/internet services, video streaming, audio advanced systems.

ArduinoMega has other adavantages, board has many input/output digitals and analogs. There are a lot of pages describing how to connect various devices.
  
I would like to combine the advantages of these two devices.

Scheme of the robot.


links:
http://www.raspberrypi.org/
http://arduino.cc/en/Main/ArduinoBoardMega