Saturday 30 September 2017

Stepper motors


Introduction

For some applications, stepper motors are useful. precise alignment of the motor axis in the preset position. The problem with control is that the control signals are sent hundreds, thousands of times per second.

Devices

In my test I use chap driver build on ULN2003 chip and stepper motor  28BYJ-48

Cheap ULN2003 stepper motor driver


Arduino Nano connection with two ULN2003 drivers and 28BYJ-48 motors

Solution


In my idea, control is separated by the following:
- main control app is write in Java and working on RaPi. App use library to communication with Arduino and sending high level intruction: turn left 20 steps, turn right 100 steps, turn on motor pernamently, stop motor, etc.
- on Arduino is installed app, receiveing command from USB port (from RaPi) encode and send appropriate signals to  selected motors.
- app can control unlimited Arduino modules, and control max 3 motors per Arduino (limit is the number of arduino outputs)
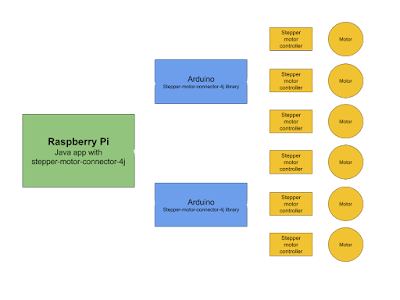
Idea of stepper motor control

How to install


Download Arduino sources from stepper_motor_ctrl_by_serial.ino, use Arduino IDE and compile and install on Arduino.

Download jar library stepper-motor-connector-4j-0.1.0.jar and add to your Java project.

Full project sources are available on GitLab https://github.com/SulacoSoft/stepper-motor-connector-4j.

Available functions


Init motor on port COM7 (Windows USB port name, on linux example name is ttyUSB7) and define stepper motor controler pins on Arduino 6, 7, 8, 9:
StepperMotor motor = StepperMotorFabric.create("COM7", 6, 7, 8, 9);

Rotate 2048 steps to left:
motor.rotateLeftSteps(2048);

Waiting to estimated time end operation (rotateLeftSteps or rotateRightSteps):
while (!motor.isReady())
    Thread.sleep(10L);

Turn right 512 steps:
motor.rotateRightSteps(512);

Turn pernamently rotate right:
motor.rotateRightOn();

Turn pernamently rotate left:
motor.rotateLeftOn();

Stop motor (when motor is run rotateLeftOn or rotateRightOn):
motor.rotateOff();

Disconnect motor (releas pins and motor instantion):
StepperMotorFabric.disconnect(motor);

We can change delay time between motor steps in microseconds. This parameter change delay time on all connected motors to selected Arduino board:
motor.setDelay(1200);

We can connect several motors:
StepperMotor motorA = StepperMotorFabric.create("COM7", 2, 3, 4, 5);
StepperMotor motorB = StepperMotorFabric.create("COM7", 6, 7, 8, 9);

Completly example


Full Java example:

import com.sulacosoft.robots.steppermotor.StepperMotor;
import com.sulacosoft.robots.steppermotor.StepperMotorException;
import com.sulacosoft.robots.steppermotor.StepperMotorFabric;

public class Main {
  public static void main(String[] args) throws StepperMotorException {
  StepperMotor motor = StepperMotorFabric.create("COM7", 2, 3, 4, 5);
    try {
      motor.rotateRightSteps(4096);
              while (!motor.isReady())
        Thread.sleep(10L);
              motor.rotateLeftOn();
      Thread.sleep(2000);
      motor.rotateOff();
         } catch (InterruptedException e) {
      e.printStackTrace();
    } finally {
      StepperMotorFabric.disconnect(motor);
    }
  }
}


links:
https://github.com/SulacoSoft/stepper-motor-connector-4j
https://www.codeproject.com/Tips/801262/Sending-and-receiving-strings-from-COM-port-via-jS
https://github.com/scream3r/java-simple-serial-connector
https://github.com/nyholku/purejavacomm
http://kishor15389.blogspot.hk/2011/05/how-to-install-java-communications.html
https://code.google.com/archive/p/java-simple-serial-connector/
http://search.maven.org/#artifactdetails%7Corg.scream3r%7Cjssc%7C2.8.0%7Cjar
http://www.instructables.com/id/BYJ48-Stepper-Motor/
http://42bots.com/tutorials/28byj-48-stepper-motor-with-uln2003-driver-and-arduino-uno/

Sunday 27 August 2017

Firmata - Raspberry Pi (part 2b, access from Java)

Introdution


We have prepared earlier Arduino with an installed library Firmata (post how to prepare Arudino with firmata - link). Now we connect from the Raspberry to the Arduino with Firmata. We have the possibility to connect from most programming languages. In my opinion, best choice is Java.


We need

  • Raspberry Pi with installed ArchLinux
  • Arduino(Mega) with installed Firmata library (Firmata - Arduino)
The ArduinoMega connected to the Raspberry Pi


Installation Java Development Kit


refresh of all package list:
# pacman -Syy
 install open JDK:
# pacman -S jdk8-openjdk
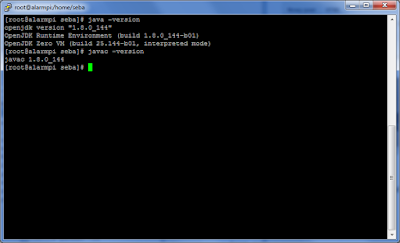
 test jvm:
# java -version
test java compiler:
# javac -version
 you should see something similar to:


Java firmata library


There are many implementations firmata on java. My choice fell on firmata4j.

Writing Arduino equivalent "Hello world" application


We have two basic software way to build java application:
  • connect Arduino to your PC computer (not Raspberry), write appliction, compile, tests and move copiled binary to Raspberry
  • connect Arduino to Raspberry, write application, compile, test and run on Raspberry
I'm going show the example by first scenario. I use on my workstation PC:
  • JDK - Java Development Kit, Oracle or Open Source distirbution, it does not matter.
  • gradle - open source build automation system 
  • Eclipse - IDE for Java development
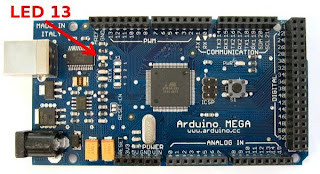
Now we write simple application that controls LED13 on Arduino.

Localization LED13


Full Java code of this app is below:

import java.io.IOException;
import org.firmata4j.IODevice;
import org.firmata4j.Pin;
import org.firmata4j.Pin.Mode;
import org.firmata4j.firmata.FirmataDevice;

public class Main {

  private static final int PIN_NUMBER = 13;
  private static final long DELAY_MILISECONDS = 1000;
  private static final long LOOP = 10;

  public static void main(String[] args) throws IOException, InterruptedException {
    IODevice device = new FirmataDevice("COM3"); // construct the Firmata device instance using the name of a port
    device.start(); // initiate communication to the device
    device.ensureInitializationIsDone(); // wait for initialization is done
    Pin pin = device.getPin(PIN_NUMBER);
    pin.setMode(Mode.PWM);
   
    for (int i = 0; i < LOOP; i++) {
      Thread.sleep(DELAY_MILISECONDS);
      pin.setValue(1); // on led
      Thread.sleep(DELAY_MILISECONDS);
      pin.setValue(0); // off led
    }
    
device.stop(); // stop communication to the device
 }
}

Full code with gradle configuration file can you download from link.
clone project (or download from page):
# git clone https://github.com/SulacoSoft/robotics-examples-firmata-blink-led13.git
create Eclipse configuration files:
# gradle eclipse
 run Eclipse and import project, click right button on Project Explorer, select Import > Import... > Existing Projects into Workspace.

Change port on line:
IODevice device = new FirmataDevice("COM3");
If you run on windows, set valid port definied as: COM1, COM2, COM3, ...

If you run app on linux, you must definied port have style: /dev/ttyUSB0, /dev/ttyUSB1, /dev/ttyUSB2, ...

Remember, port on your workstation is different than a port on Raspberry. When you move binary from workstation to Rasberry, you must change port number. Best practices is to store configuration in a external file.


links: